
Your Guide to Acrylic Paint Mediums, Gels, and Pastes
This how-to guide to working with acrylic paint mediums, gels, pastes and more will help you expand the possibilities in every painting.
By Sandra Duran Wilson
When you walk into the art supply store, are you befuddled by the rows of acrylic products and acrylic paint mediums that all look the same? You’re not alone. In this article, I’m unraveling the mysteries of acrylic paint mediums, gels, and pastes. Each product has qualities that enable acrylic painters to achieve a multitude of special effects and textures. For the best results, I recommend starting with artist’s grade acrylic paint, even if you’re just getting started with acrylics.
1. Gels
Gels are available in a variety of viscosities (the product’s thickness), such as soft, regular, heavy, and extra-heavy body. There are also sheen options including matte, semi-gloss and gloss. When choosing a viscosity, remember that the higher the viscosity, the higher the peaks. Gels can cause acrylic paint to shrink; test for this, and consider a high-solid gel product to avoid shrinkage.
Golden 30405 Acrylic Medium Regular Gel Semi-Gloss

Golden Artist Colors – Soft Matte Gel Medium

Golden Artist Colors – Soft Gel Gloss

White When Wet, Clear When Dry

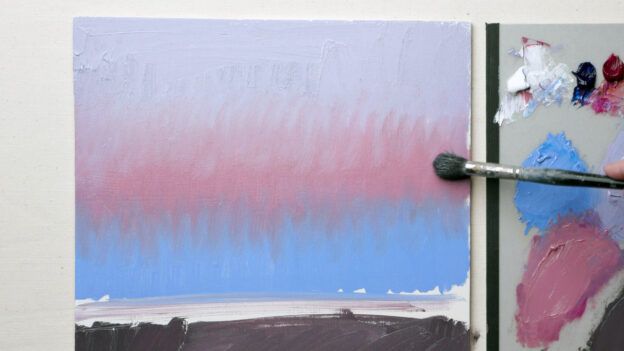
In general, gels are white when wet, and transparent when dry. They’re like colorless paint. One benefit of incorporating gels is their ability to extend your paint, thus saving you money. It may take some hands-on practice to become accustomed to how gels interact with color. When gel is added to paint, the color of the paint becomes lighter, but dries to its out-of-the-tube color. I recommend making a chart illustrating the differences until you become familiar with gel’s effect on paint, such as my chart above.
Creating Texture and Sgraffito Effects With Gels

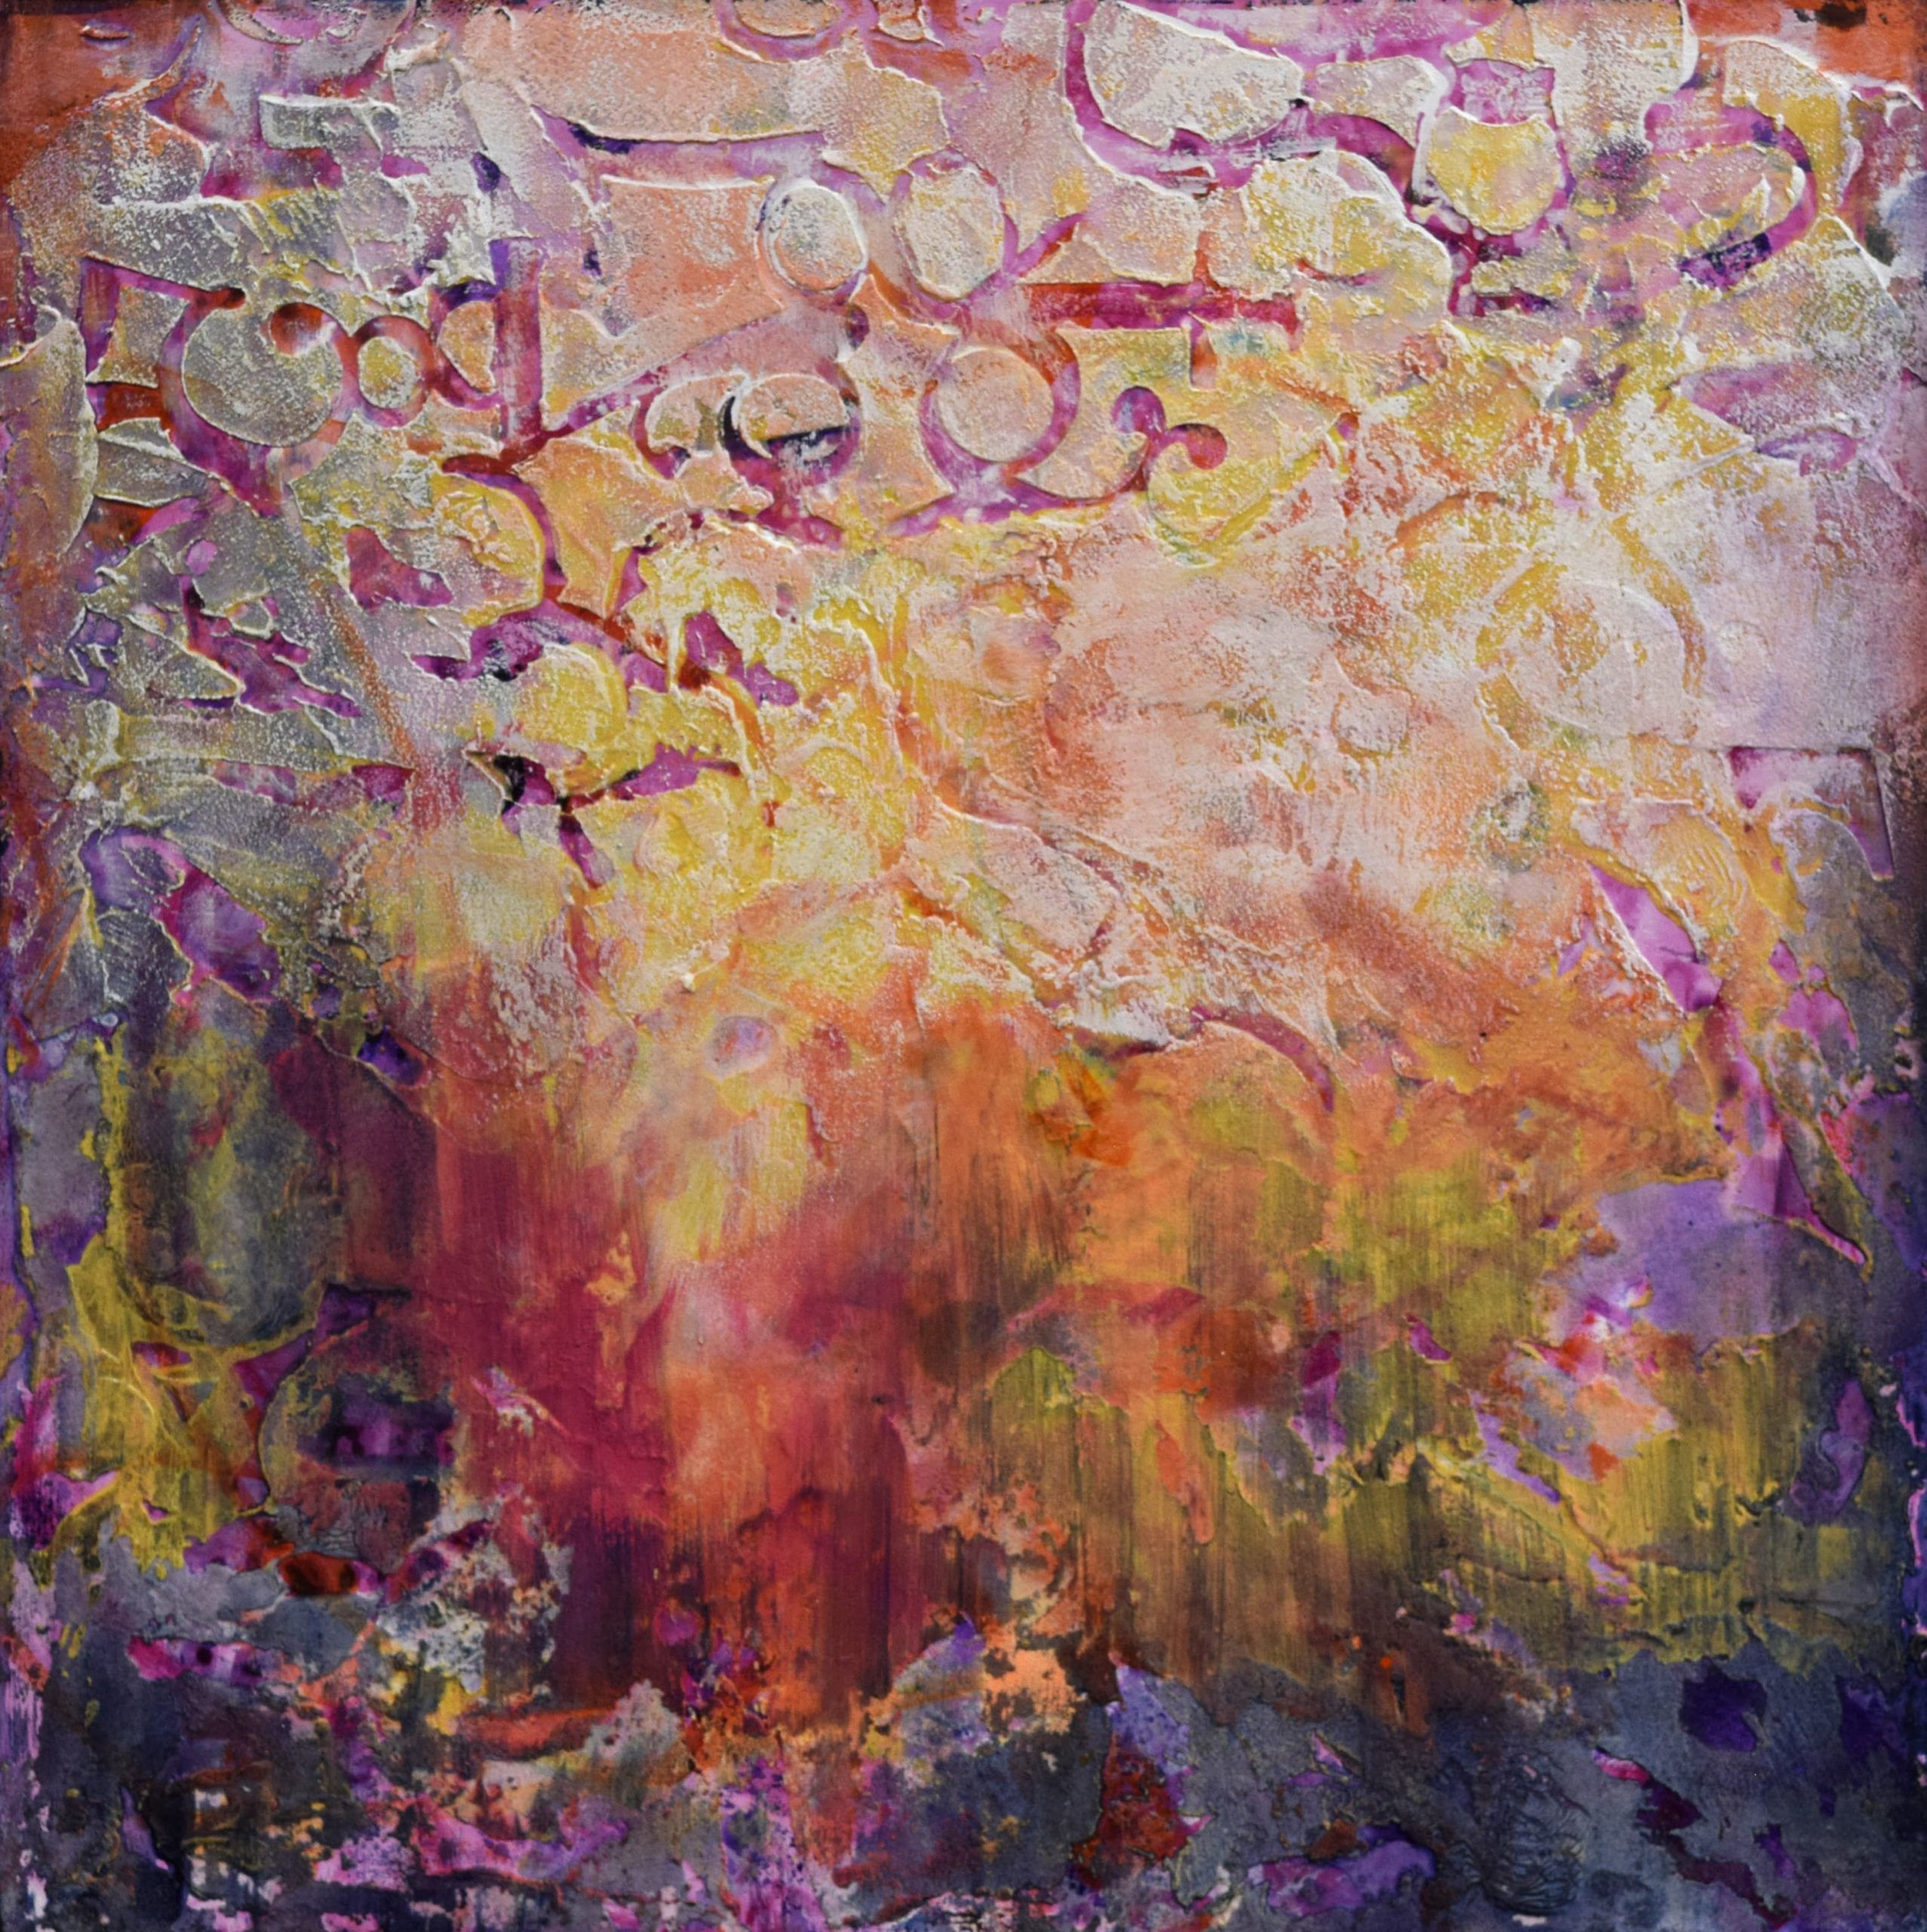
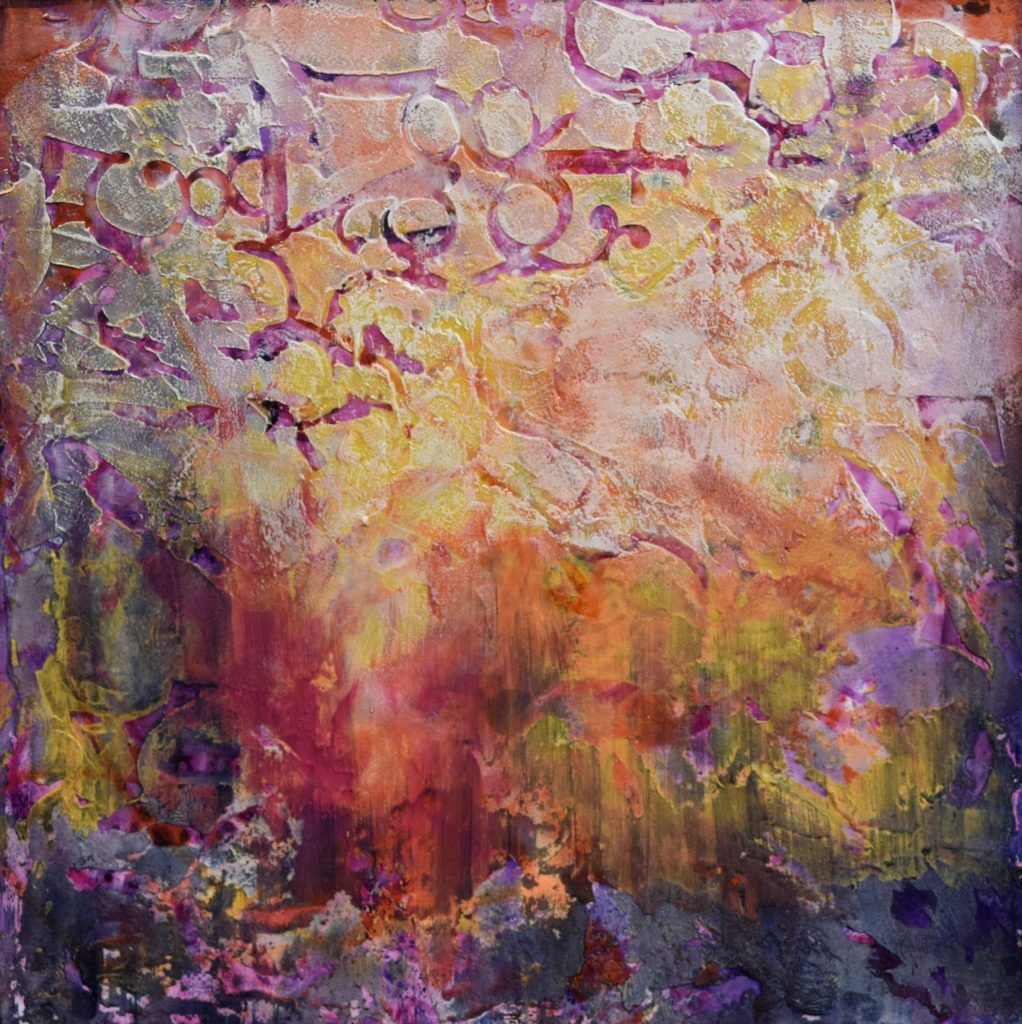
Create texture. You can create soft folds or high rigid peaks with your acrylic paint depending on the viscosity of the gel. To create a transparent layer without much texture, use a palette knife to spread a layer of soft gel gloss. Let the layer dry before adding additional layers. This method creates wonderful visual depth. Or, mix color into the gel and spread it over a background color to create layers of color.
In the example above, I painted the background violet and let dry. I mixed a small amount of quinacridone red into soft gel semi-gloss and used a knife to spread the mixture. I then applied some of the mixture in thin layers and some in thick layers and left other areas unpainted to allow the violet background to show through. To create high peaks, mix heavy gel with your paint. This technique also extends the paint’s volume.
Sgraffito is a fun way to add broken color to your surface. In the above image, I painted the background with pyrrole red. When dry, I scraped a layer of heavy gel gloss mixed with diarylide yellow over the surface using a palette knife. While the gel mixture was still wet, I drew on the surface with a knife tip, revealing the underlying color. Notice that I didn’t thoroughly mix the paint into the gel. As a result, I achieved an almost marbled effect with the yellow rather than a solid mass.
Altering Sheen With Gels
Acrylic paints tend to be glossy when dry, but you can take control of the sheen by adding acrylic paint mediums like semi-gloss or matte gel to the paint.
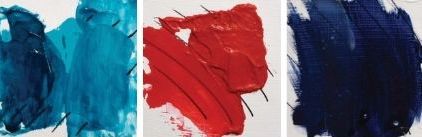
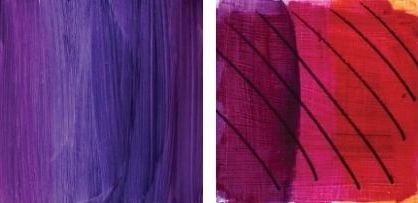
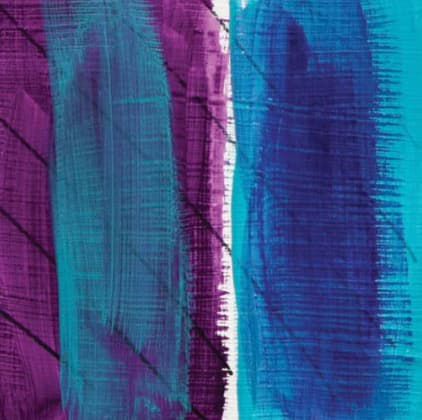
Gloss: The background color is Liquitex bright aqua green. When dry, a layer of phthalo turquoise was mixed with soft gel gloss and spread with a knife over the surface. On the left side, I applied a thick application; the right has a thin application. The black lines were painted on the background to indicate transparency.
Matte: I mixed Naphthol red light into semi-gloss regular gel and spread the mixture in a thin application on the left and a thicker application on the right. I also was able to control the paint’s transparency.
In the final example, I altered the paint’s sheen by applying a layer of gel over the dry paint. I applied matte gel on the left side and semi-gloss on the right.
Extending Paint Volume With Gels
Extend your paint by mixing it with gels. I often add a few drops to a tablespoon of gel into my paint, working it together with a knife. I prefer using a knife over a brush because the gel can clog a paintbrush and create unsightly brush marks.
2. Polymer Mediums

This product is a pourable acrylic paint medium. As with gels, it’s white when wet and clear when dry, and is a great paint extender. I like to use a knife to mix my paint into the medium. You may also use a brush since polymer medium has a lower viscosity than the previously discussed gels. Polymer medium makes opaque paint more transparent.
Red iron oxide, a mineral color, is opaque, and it becomes more transparent when a polymer medium is added. You can see how the dark lines show the transparency.
Golden Fluid Matte Medium

Golden Acrylic Medium Glaze Liquid Satin

Golden Open Acrylic Medium

Blending and Glazing with Polymer Mediums
Blending. Polymer medium makes it easier to blend colors together and, when a bit of water is added to the mix, the open time is extended. In the image above, used a combination of Payne’s gray and permanent violet dark, both mixed with polymer medium, and blended the two colors together.
Glazing. The difference between a mixture of paint with polymer and glazing medium with paint is that the glazing medium has a retarder added so it doesn’t dry as quickly. You may add some water to the polymer mixture to increase its open time.
In the example above, I painted the background with quinacridone magenta. When dry, I painted a glaze made of polymer medium and permanent violet dark on the left side. Next, I painted the right side with a similar mixture using transparent pyrrole orange. The strip down the center of the image reveals the quinacridone magenta background color.
Color Mixing by Layers with Polymer Mediums
Create vibrant colors by layering paints rather than blending colors. For example, paint a color, let it dry, then layer a new color that has been mixed with a polymer medium. In the image above, I painted the left side with permanent violet dark. When dry, I painted a mixture of cobalt teal and polymer medium over the surface. On the right side, the colors are reversed. I find that making a chart of some of my favorite layer combinations comes in handy while painting with acrylic paint mediums.
Working With Fluid Matte Medium
This is a pourable medium with particulates added to give it a matte appearance. This product lightly veils, or pushes color intensity back, creating a wax-like appearance. When I’m building a surface with many color layers, l use polymer medium gloss with the color layers and finish with fluid matte medium at the end.
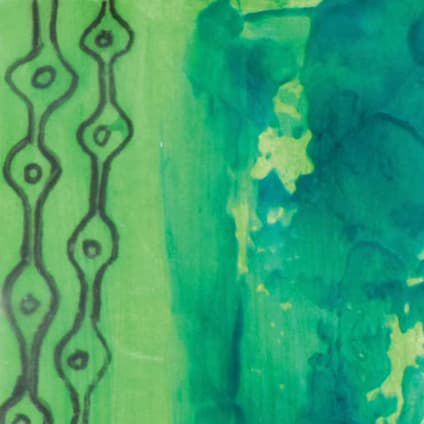
In my demonstration image, I painted the background a light green and allowed it to dry. Next, I applied a layer of fluid matte medium and let that dry. To add a design element, I drew on the left side of the canvas with a soft pencil, and applied additional fluid matte medium over the drawing. On the right side, I mixed permanent green into the medium.
3. Pastes
Here, we’ll examine modeling paste, coarse paste and light modeling paste. You might also see hard and flexible pastes. Pastes are white when wet and opaque when dry. Pastes contain marble dust to give them opacity. Manufacturers name their pastes differently, calling them molding or modeling, but they’re the same.
Golden Artist Colors – Molding Paste

Golden Artist Colors – Coarse Molding Paste

Golden Acryl Med 8 Oz Crackle Paste

Modeling Paste and Embossed Textures
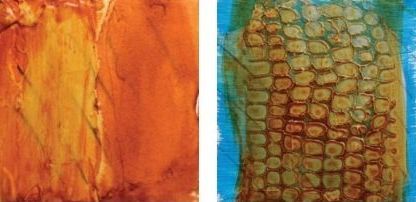
Modeling Paste. The paste has a thick viscosity, so spread it with a palette knife. I prefer to spread the paste, let dry and then add paint on top. Molding paste is a bit more absorbent than the gels, but not as absorbent as the light molding paste. Depending on the thickness in which it’s applied, it may be translucent or opaque. In the example above, I applied modeling paste on the left side and light molding paste on the right. Then I brushed watered-down quinacridone gold over both sides. As you can see, the right side is far more absorbent.
Embossed Texture. In the example above, I painted blue azure as a background. When dry, I applied a thin layer of modeling paste. While wet, I pressed a textured paper into the paste and removed. When the paste was dry, I brushed on watered-down quinacridone gold paint.
Light Modeling Paste and Textural Peaks
Light modeling paste. Light modeling paste has the viscosity of whipped cream and is very absorbent. When it’s applied in a thin layer, it can act like a veil. If it’s thicker, it becomes opaque. I painted phthalo turquoise as a background color in the sample image above. When the color was dry, I spread a thin layer of light molding paste on top of it with a palette knife. Notice that in areas where it’s thicker, it shows as white.
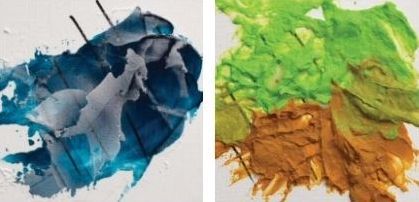
Textural Peaks. Light modeling paste can hold extremely high peaks and is a lightweight alternative to heavy modeling paste. You can apply it in thick impasto layers onto large stretched canvas without fear of the canvas pulling off the stretcher bars due to its weight. In my example above, I mixed vivid lime green and yellow ochre with the light modeling paste, and drew the paste up with my palette knife to create peaks.
Opacity and Lightening Colors With Light Modeling Paste

Opacity. Where gels and mediums make opaque paints more transparent, light molding paste makes paint less transparent. This works especially well with modern colors. In the example above, I mixed transparent pyrrole orange with light modeling paste on the left-hand side. The right features just paint.
Lightening colors. Light modeling paste has a unique quality that’s very handy. Mixing modern colors with white tends to yield pastels, but light modeling paste lightens colors without making them dull. In the sample image above, I mixed quinacridone magenta mixed with light modeling paste on the left; on the right, I mixed the same paint with titanium white. I used equal amounts of paste and paint.
Combo Exercise: Light Modeling Paste and Iridescent Bronze Paint

Try this combination. Light modeling paste is very absorbent, holds textures well, and when combined with the unique properties of Golden iridescent bronze, makes for a beautiful finish. Here’s a fun exercise: I applied light modeling paste and while wet, pressed a dowel into the paste to create interesting marks. When the paste was dry, I brushed on a very watered-down iridescent bronze paint. This only works if the paint is very diluted. It takes a few minutes for the bronze particles and the green color to separate.
Coarse Molding Paste

This paste has a bit of grit to it and it dries to an off-white gray finish. The tooth makes it ideal for drawing or using pastels on top of it. Try using it to prepare a surface for pastels or as a unique painting surface. For the example above, I spread the paste in a thin layer. When dry, I applied fluid paints on the surface, creating almost a watercolor paper look. When the paint was dry, there was still enough tooth to draw on it with a red pastel pencil.
4. Combining Acrylic Paint Mediums, Gels, and Pastes
Two or More Pastes

Combining Pastes. Mixing two or more of the pastes together can create even more viscosities, absorbencies, transparencies and textures. I placed a small amount of the three different pastes onto the surface and used a palette knife to blend them together in the image above. I didn’t completely mix them, but let their properties overlap. While the pastes were still wet, I pressed plastic lids or other objects into them to create texture. I let the pastes dry and then brushed on a watered-down paint of cobalt blue.
Combining Gels and Pastes
Gels and Pastes. When you combine the transparency of gels and the opacity of the pastes, you get an interesting surface texture. I often jump-start a painting by creating a surface using both pastes and gels. I created the background above by roughly mixing modeling paste, light modeling paste, and regular gel gloss. Then I spread the mixture using a knife to create deep texture. When dry, I brushed on a watered-down green paint. When dry, I brushed a brown glaze over the top half. Adding the darker color enhanced the texture.
Hybrid (Extra-Heavy Gel Molding Paste)

Hybrid. Extra-heavy gel molding paste by Golden is a hybrid mix of paste and gel. In this example, I applied a background color of green/gold. When dry, I added the hybrid mix. This hybrid mix is opaque in a thick application and translucent in a thin layer.
Pumice Gel and Combination Pumice Layers

Pumice Gel. This is really a specialty gel. I like to mix it with a gel so it’s easier to spread. I can also change the transparency and the absorbency depending on the gel I mix with the pumice. You may find it as coarse pumice or ceramic stucco depending on the brand. In the image above, the left side has pumice applied, and the right side has pumice mixed with soft gel gloss. I could alter the absorbency and transparency by mixing it with matte gel, or I could even make my own coarse molding paste by mixing the pumice into the paste.
Combination Pumice Layers. Here I, put a combination of pumice and gel onto the surface and let the products dry. Then I flowed a watered-down quinacridone gold paint over the surface so it settled into the recesses. When dry, I added a gel layer. The right side has cobalt turquoise mixed into the regular semi-gloss gel, and the left side has untinted gel spread over the surface. When this layer was dry, I rubbed an orange color over the surface.
Acrylic Paint Mediums and Gels as Collage Adhesives
The acrylic gels and mediums we’ve been reviewing work beautifully as archival collage adhesives. Match the weight of your paper to the weight of the gel. For example, if you’re going to glue a thin paper, use polymer medium. A regular-weight paper would take soft gel, and a heavyweight paper would need a heavyweight gel. I prefer to use gloss gels when gluing because they dry the clearest. I can always alter the final sheen by adding a layer of gloss, semi-gloss or matte.
The techniques and textures that gels, pastes and acrylic paint mediums make possible are priceless. I find I buy paint a lot less frequently, and I love creating textures with the assorted products. I know how to alter the transparency, change viscosity and create rich colors by layering colors with mediums and gels. The key is allowing the layers to dry in between and compensating for the shift from white to clear. Experiment and chart your results!
Meet the Artist
SANDRA DURAN WILSON is an abstract American painter and sculptor based in Santa Fe. She’s been painting professionally for more than 20 years, and her work is represented in public and private collections. She shares her knowledge through workshops, writing and DVDs. Learn more at sandraduranwilson.com.
A version of this article first appeared in Acrylic Artist magazine in 2021. Updated October 2023


Join the Conversation!